Hazeel Cult OSRS Guide: Steps, Rewards & Which Side to Pick

By Helen Gray | Created: March 31, 2026 | Last updated: March 31, 2026 | Read Time: 6 minutes

Hazeel Cult OSRS: The Carnillean Family Secret

Welcome back to another Chicks Gold guide! This week we're covering the Hazeel Cult OSRS quest, and it's one of the more interesting ones because it actually gives you a choice. You can help the Carnillean family get their stolen armor back and shut down a dark resurrection plot, or you can say forget it and join the cult yourself to help bring Hazeel back to life. Either way, we'll walk you through both paths from start to finish.

Let's get into it.

OSRS Requirements for Hazeel Cult

Great news if you're looking for a quick one to tick off the list. Hazeel Cult is a novice members-only quest with almost no requirements, so it's accessible early on and won't take long to finish. Here's what we'd recommend bringing along:

  • Combat level 10 (only needed if you're taking Ceril's side and fighting Alomone, a level 13 Cultist)
  • Ardougne Cloak for easy teleports
  • Stamina or energy potions to save yourself some running
  • That's genuinely it. No skill requirements, no item prerequisites. Just note that if you go the Ceril route, the Dwarf Multicannon won't work on Alomone, so don't bother bringing it.

Which Side Should You Pick in Hazeel Cult OSRS?

Before you jump in, it's worth knowing what each path actually involves so you're not caught off guard. Ceril's side is the "good" option. You're helping the Carnillean family, there's one combat encounter with Alomone (level 13), and you pick up an extra 5 coins at the end. It's slightly faster overall.

Hazeel's side is the "evil" route. You're joining the cult, helping poison a Carnillean family member, and working toward resurrecting Hazeel. No combat required, a few more steps involved, and you get the Hazeel's Mark cosmetic as an exclusive reward.

Neither choice has any lasting effect on your account or future quests, so just pick whichever sounds more fun to you.

Hazeel Cult OSRS Guide: Ceril's Side

Starting out

Head to the southwest corner of East Ardougne, north of the Clock Tower, and speak with Ceril Carnillean inside his home. Accept the quest and tell him you'll help.

Finding Clivet

Walk south from the house, cross the bridge, and head east toward the Clock Tower. There's a cave entrance on the eastern side; go in and find Clivet. He'll try to pull you into the cult by telling you the story of Hazeel, an ancient Zamorakian follower who was killed off by one of Ceril's ancestors. You'll want to refuse him.

One important thing here: when the dialogue options come up, choose to ask him what he means rather than saying "you're talking rubbish." It sounds like a minor thing but if you pick the wrong option, you'll lose the chance to get the armor from Alomone later. You can still refuse to help him, just do it through the right dialogue path.

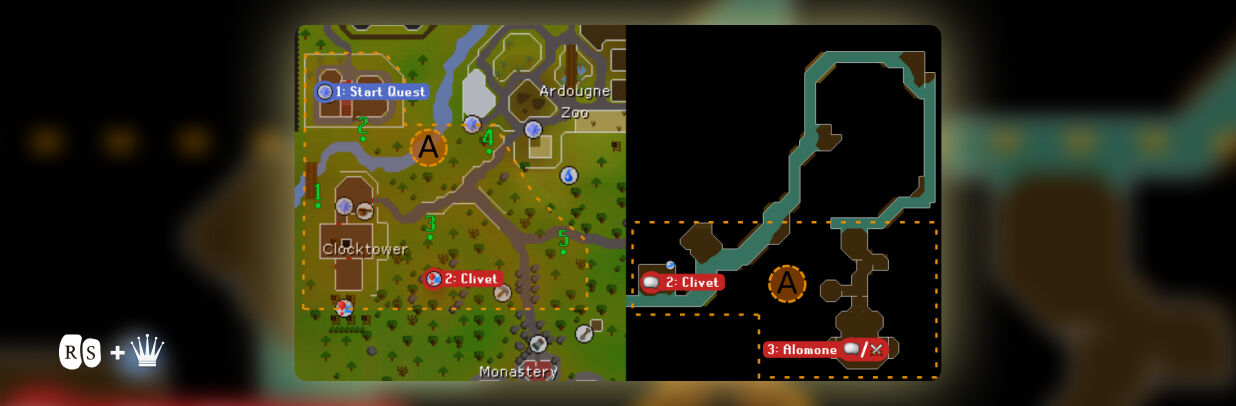
Setting the Sewer Valves

After Clivet sails off, go upstairs and find the five Sewer Valves. Here's where each one is and which way to turn it:

  • Valve 1 – Right across the bridge, south of the Carnillean house. Turn right.
  • Valve 2 – Behind the Carnillean house. Turn right.
  • Valve 3 – Inside the north cave. Turn left.
  • Valve 4 – South of the penguin cage in the zoo. Turn right.
  • Valve 5 – Southeast of Valve 4, just past the monk. Turn right.

Taking down Alomone

Once all five valves are in position, head back to the cave, board the raft, and speak to Clivet again. Then make your way to the last room to the south and talk to Alomone. He'll have a go at you before attacking, so put him down and open the chest inside the room to grab the Hazeel Cult armor.

Quick tip: if you want a second set of the armor, drop what you just picked up, reopen the chest, grab the new set, then pick up the one you dropped. Easy duplicate.

Wrapping up Ceril's side

Take the raft back, return to the Carnillean house, and talk to Butler Jonas and then Ceril on the ground floor. He'll take the armor and hand over 5 coins but won't believe a word you say about Jonas being involved in the cult.

Go to the cupboard on the first floor and you'll find the Mark of Hazeel sitting there alongside a bottle of poison. Bring both to Ceril. He'll fire Jonas on the spot and hand you the full quest reward.

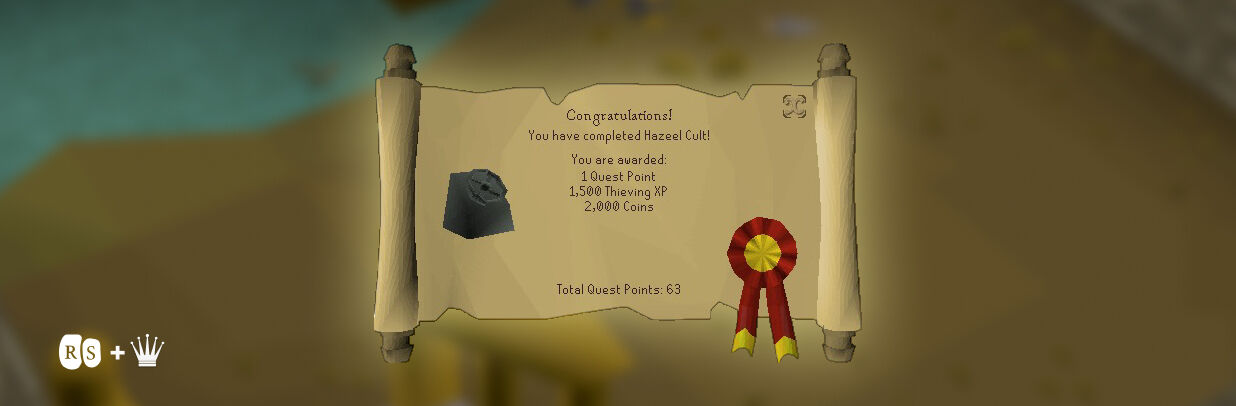
Hazeel Cult OSRS Rewards: Ceril's Side

Here's what you walk away with after helping the Carnillean family:

  • 1 Quest Point
  • 1,500 Thieving XP
  • 2,005 coins (2,000 base plus the extra 5 from the fake ending)
  • 5 Kudos, claimable by speaking to Historian Minas at the Varrock Museum

Hazeel Cult OSRS Guide: Hazeel's Side

Starting out

Same starting point. Speak to Ceril at his home and accept the quest, but this time you're playing both sides.

Joining the cult

Head to the cave east of the Clock Tower and speak with Clivet. When he asks for your help resurrecting Hazeel, agree this time. He'll fill you in on everything and set you on your first task.

Poisoning the household

Your job is to take out a member of the Carnillean family. Go to the basement of the house and use the bottle of poison on the range. Head upstairs and speak to Ceril. He'll be upset but for a different reason than expected since Scruffy the dog ended up being the victim instead. The quest moves forward regardless.

Setting the valves and finding the scroll

Talk to Clivet again and he'll hand you Hazeel's Mark before sending you off to find the cult hideout. The five valve positions are exactly the same as Ceril's side, so refer to the list above. Once the valves are set, go back to the cave, board the raft, and speak with Alomone at the main hideout. He'll ask you to track down a scroll. Head back to the Carnillean house and speak to Butler Jonas, then search the crate in the basement for a chest key. Make sure you finish the entire dialogue with Jonas or the key won't actually appear in your inventory, which is a frustrating thing to miss. With the key in hand, go upstairs, knock on the northern wall of the eastern room, and climb the ladder. Use the key on the chest to get the scroll.

Finishing the resurrection

Return to Alomone with the scroll. He'll kick off the resurrection sequence and the quest will complete from there.

Hazeel Cult OSRS Rewards: Hazeel's Side

Here's what you get for helping the cult:

  • 1 Quest Point
  • 1,500 Thieving XP
  • 2,000 coins
  • 5 Kudos, claimable from Historian Minas at the Varrock Museum
  • Hazeel's Mark (cosmetic item, exclusive to this path)

What is the OSRS Hazeel Cult Armor?

The Hazeel Cult armor is only obtainable through Ceril's route by defeating Alomone. It's untradeable and has no combat stats, so it's purely a cosmetic collectible. Since it's not available on the Grand Exchange and is tied entirely to this one quest, it's worth grabbing if you're a completionist or just like having unique items in your bank.

Frequently Asked Questions: Hazeel Cult OSRS

Which side should I pick in Hazeel Cult OSRS?

Totally up to you. Ceril's side is a little quicker and earns you 5 extra coins. Hazeel's side skips combat and gives you the Hazeel's Mark cosmetic. Neither choice affects anything beyond this quest.

What are the Hazeel Cult OSRS rewards?

Both sides reward 1 Quest Point, 1,500 Thieving XP, 2,000 coins, and 5 Kudos. Ceril's side adds 5 extra coins while Hazeel's side adds the Hazeel's Mark.

What is the OSRS Hazeel Cult armor?

It's an untradeable cosmetic armor set you get by looting the chest after killing Alomone on Ceril's path. No combat stats, just a neat collectible from the quest.

Is Hazeel Cult a requirement for any other quests?

Yes. It's a direct requirement for Secrets of the North, so if that's on your to-do list, make sure this one is done first.

Can F2P players do Hazeel Cult?

No, it's members only.

Is Hazeel's Mark tradeable?

No, it's untradeable and only available by completing Hazeel's side of the quest.

No matter which side you landed on, Hazeel Cult is a quick and painless quest with a bit of actual story to it, which is always a bonus. Don't sleep on it either since it's tied to Secrets of the North so it's worth getting done sooner rather than later. Check out our blog for more OSRS quest guides and if you need gold, items, or any OSRS services, head over to Chicks Gold and see what we've got on offer.


Author profile
Helen Gray

Helen is a gaming blogger with a talent for dissecting complex gameplay. Her insightful analysis and vivid writing style place readers right in the heart of the games she passionately explores.


Related Articles
logo
Firelands Raid in WoW - The Siege of Seven Firelands Raid in WoW - The Siege of Seven Tips & Tricks

Welcome back to the Chicks Gold blog series; we’re back once again to bring you everything you need for a successful in-game endeavor. This week, we’ll be working through the steps to victory in the Firelands WoW raid. We’ll take a look at the layout, loot, strategies, achievements and more to give you a crystal clear vision of success. This is the main raid of the third phase of Cataclysm, giving players an intense adventure where the stakes are high and teamwork is essential. Between 10 to 25 players can group together to take on this challenging battle, so gear up, get your ducks in a row, and get ready for war! Let’s get started with how to reach this heart-racing battle:

firelands raid wow, boss map

WoW - How to Get to The Firelands Raid?

Within your map, you will see Mount Hyjal, and within this area, the Firelands can be found in a zone to the south and surrounded by lava. This is where you can find the vendor for the raid and a summoning stone you can use to summon the rest of your group before entering the WoW Firelands Road entrance. The next thing to get to grips with is the layout of the Firelands raid in WoW. So let's take a look:

Firelands Raid WoW Layout

When you enter, you’ll see that the first section contains five of the seven enemies that you will be facing. Here are the bosses you’ll be facing here:

  • Shannox
  • Lord Rhyolith
  • Beth’tilac
  • Alysrazor
  • Baleroc The Gatekeeper

You can take on the first four in any particular order before battling Baleroc to unlock the next area of the Firelands WoW raid. Once you have done so, enter the second area, where you will encounter Majordomo Staghelm in battle. Lastly, you must face Ragnaros.

The next thing we’ll be exploring in this WoW Firelands raid guide is the Boss strategies to ensure you’re well prepared for the fight ahead. So, let’s get started!

Firelands Raid WoW - Strategies

Each of the seven bosses has their own unique mechanic, which you must master in order to take the win. So, wrapping your head around these before you run into the battlefield will drastically improve your success rates; let’s check out a little bit about each of the enemies you’ll be taking on.

firelands raid wow, shannox

Shannox - Battle Strategies

This boss will patrol the entire front area of the Firelands, giving you more options as to when and where you want this battle to take place. So you’ll want to make sure you have cleared the area you want to use as a battleground, as you’ll be making a lot of movements throughout the fight.

Role-Specific Tips

  • DPS - remain alert of new traps and be prepared to move at a moment’s notice, especially when considering melee DPS. You must also move away from any “Hurl Spear” or “Magna Rupture” locations, as they can easily kill you.
  • Healer - tanks require frequent movement during this Firelands Raid WoW encounter, so ensure you’re always within range of your target to keep them on their feet. You’d also want to coordinate defensive cooldowns for every “Magma Rupture” towards the end of the battle.
  • Tank - your main priority in this encounter is to manage your “Jagged Tear” debuffs, and don’t be afraid to kite if necessary. You and the other tank must also remain aware of each other's positions to keep as much distance between the foes' attacks and weapons. Lastly, you’ll want to try to keep any major defensive cooldowns for the burst phase at the end of the battle.

Shannox Abilities

The last thing we’ll be looking at regarding this WoW Firelands raid boss is his movesets. So, check them out!

  • Immolation Trap
  • Crystal Prison Trap
  • Arcing Slash
  • Jagged Tear
  • Hurl Spear
  • Separation Anxiety
  • Frenzy
  • Magma Rupture

Riplimb

  • Limb Rip
  • Wary
  • Frenzied Devotion

Rageface

  • Face Rage
  • Wary
  • Separation Anxiety

firelands raid wow, rhyolith

Lord Rhyolith - Battle Strategies

For this second encounter, you and your team must control his movements by attacking his left or right leg. Whichever you choose to direct your attacks at will see him turning in that direction. Because of this, you and your fellow players must strategize the best ways to attack in order to coordinate movements and balance out the fight. You can dismiss this strategy and go straight to dealing damage directly to his torso, but this may see you and your team holding less control over the match.

This Firelands raid in WoW battle will see Lord Rhyolith using a built-in soft-enrage mechanic in “Superheated” after 6 minutes of combat (in heroic, it’s only 5 minutes). This mechanic will see Lord Rhyolith gain a stack of Superheated every ten seconds, and he will wipe out the raid if you fail to stop him shortly after the buff is gained.

Role-Specific Tips

  • DPS - melee DPS need to learn to coordinate and follow a single-direction caller to pilot the boss. Focusing adds down quickly while acting as a ranged DPS should be a top priority, and you will always be able to attack the boss's torso if you wish to avoid directional changes.
  • Healer - keep an eye on players with high stacks of “Eruption,” as AoE damage can easily kill them. In this position, you should also rotate raid-wide defensive cooldowns when Lord Rhyolith has high stacks of Superheated in phase two.
  • Tank - when your team has enough ranged DPS to kill adds quickly, you can solo tank the battle with ease and earn an extra DPS. Grab adds quickly as they spawn and stack or move them out of the raid to kill them as soon as possible. You must also be ready with your taunt as soon as the boss hits 25% health, as this is when he activates and starts the attacks on you and your team.

Lord Rhyolith Abilities - Phase One

  • Obsidian Armor
  • Molten Armor
  • Concussive Stomp
  • Drink Magma

Volcano

  • Eruption

Crater

  • Magma Flow
  • Summon Fragment of Rhyolith
  • Fragment of Rhyolith

Spark of Rhyolith

  • Immolation
  • Infernal Rage

Lord Rhyolith Abilities - Phase Two

  • Immolation
  • Unleashed Flame
  • Superheated

firelands raid wow, beth’tilac

Beth’tilac - Battle Strategies

When you and your team take on this creature, you’ll need to split into two groups: a ground-level group and a web group. In the ground group, you’ll need your AoE DPS, and you’ll be focusing on killing spider adds as the fight progresses. Your web-group will consist of one tank, at least one healer, and as much DPS as can be spared from the ground group.

Those on the ground must aim to kill the spider adds before the next spawn, and any DPS which can be spared should go to the web-group to throw as much damage as possible at Beth’tilac before the second phase begins. This Firelands raid WoW boss has the unique resource of Fire Energy, and she will start the battle with full Fire Energy, which will slowly be drained over time. This energy can be siphoned from her ”Cinderweb Drone” broods, which come to her assistance throughout the fight. Once her Fire Energy is entirely depleted, she will unleash “Smoldering Devastation,” which will end any players at the top of the web. After casting this three times, she will descend from the web and begin phase two.

Role-Specific Tips

  • DPS - killing “Cinderweb Spiderlings” is essential and must be done efficiently. Don’t waste too much damage on over-killing adds. Take some time to ensure “Cinderweb Drones” do not deplete any Fire Energy, as you will be able to inflict far less damage before phase two.
  • Healer - since tons of AoE damage is a factor in this Firelands raid WoW encounter, it’s important to coordinate healing assignments to keep the raid going as long as possible. When in heroic difficulty, you must also take time to assist plates targeted by Drones.
  • Tank - grab Cinderweb Drones quickly, face them away from the raid, and kite them from any approaching Spiderlings if they get too close. In the second phase, tanks must swap for “Widow’s Kiss.”

Beth’tilac Abilities - Phase One

  • Ember Flame
  • Meteor Burn
  • Venom Rain
  • Consume
  • Smoldering
  • Devastation

Cinderweb Spinner

  • Burning Acid

Cinderweb Drone

  • Consume
  • Boiling Splatter
  • Burning Acid
  • Fixate

Cinderweb Spiderling

Seeping Venom

Beth’tilac Abilities - Phase Two

  • Frenzy
  • The Widow’s Kiss
  • Ember Flare
  • Consume

Now that we’ve covered our third boss in the Firelands raid in WoW, let’s move on to the forth!

firelands raid wow, alysrazor

Alysrazor - Battle Strategies

For this boss encounter in the Firelands WoW raid, you’ll notice that it has four phases, with you and your team taking on numerous adds, deadly flames and literal gravity itself. Despite these four phases, most of your team's focus will center around the first phase, which lasts three minutes (four minutes and ten seconds in heroic). When enraged, the boss will blast the area with “Firestorm,” which will cover the WoW Firelands raid entrance and exits with Volcanic Fire before taking flight over the battlefield. Alysrazor will then do a strafe-run over the field once a minute, attending those in range with Blazing Claw.

This is where you’ll see her dropping Molten Feathers, which you can collect to gain a buff (up to three feathers can be collected).

Role-Specific Tips

  • DPS - kill adds as efficiently as possible and do not waste damage on padding or overkill. You must also keep your Blazing Power stacks if you want to kill this boss quickly.
  • Healer - keep your tank in your sights during phase one; they’ll need to move a lot during this first phase and may need your assistance at a moment's notice; they’re subject to massive damage in the fourth phase, too, so be ready with defensive cooldowns.
  • Tank - keep your healers in your sights, working with them to ensure you can get the help you need when you need it. Make sure you keep the “Voracious Hatchlings” constantly facing away from the raid to prevent the “Gushing Wound” from affecting other teammates. Lastly, ensure you rotate defensive cooldowns in phase four to survive “Blazing Claw.”

Alysrazor Abilities - On Pull

  • Fire Storm
  • Volcanic Fire

Alysrazor Abilities - Phase One

  • Blazing Claw

Blasting Talon Initiate

  • Brushfire
  • Fieroblast
  • Fire It Up!

Voracious Hatchling

  • Gushing Wound
  • Imprinted
  • Hungry
  • Satiated
  • Tantrum

Plump Lava Worm

  • Lava Spew

Alysrazor Abilities - Flying Player

Molten Feather

  • Molten Feather
  • Wings of Flame
  • Incendiary Cloud
  • Blazing Power
  • Alysra’s Razor

Alysrazor Abilities - Phase Two

  • Harsh Winds
  • Fiery Tornado
  • Fiery Vortex

Alysrazor Abilities - Phase Three

  • Burnout
  • Essence of the Green
  • Spark

Blazing Talon Clawshaper

Ignition

Alysrazor Abilities - Phase Four

  • Ignited
  • Blazing Buffet
  • Blazing Claw
  • Full Power

firelands raid wow, baleroc

Baleroc - Battle Strategies

This is the fourth boss encounter in the Firelands Raid WoW, and it must be defeated after you have battled the first four in any particular order. It is the downfall of this boss which will open the gates to the deeper sections of the Firelands for you and your team to take home the win. Fortunately, this battle is fairly straightforward and acts more as a gear check with only a few mechanical responsibilities. Your main concern will be the mechanic the DPS will be dealing with, namely the “Shards of Torment,” which appear throughout the room. For every shard, at least one player must have their focus on it, as if one spawns, and if left alive unattended, it will cast “Wave of Torment” and wipe the raid.

Role-Specific Tips

  • DPS - keep a close eye on “Shards of Torment” and position them within melee range, surrounding them where possible. When playing the WoW Firelands raid in heroic difficulty, be more mindful of the “Tormented” debuff to prevent it from spreading.
  • Healer - find harmony with your two healer squads; have one focus on stacking “Vital Spark” and the other on keeping the tanks standing. The stacks of Vital Spark will last for 60 seconds and will reset after activating “Vital Flame” to allow you to keep stacks. Lastly, as a healer, ensure you don’t get carried away with stacks and communicate when you need to swap duties with other bailable healers to keep the tanks standing.
  • Tank - use avoidance gear to dodge, parry and miss attacks made during “Inferno Blaze” and “Decimation Blade.” You must also always keep your eye on the Shards of Torment positioning in melee range to ensure you aren’t slain by the Tormented debuff.

Baleroc Abilities

  • Decimation Blade
  • Decimating Strike
  • Inferno Blade
  • Inferno Strike
  • Blaze of Glory
  • Incendiary Soul
  • Shards of Torment
  • Wave of Torment
  • Torment
  • Tormented
  • Vital Spark
  • Vital Flame
  • Countdown

firelands raid wow, majordomo

Majordomo Staghelm - Battle Strategies

For the sixth Firelands raid in WoW and the final step between your team and Ragnaros, you’ll need to manage multiple buffs, as well as his two shapeshifting forms. “Cat form” and “Scorpion form” will activate differently depending on your team's positioning during the raid. For every time he shifts form, he will gain a stack of “Fury,” which will increase all damage dealt by 8% per stack, acting like a soft-enrage, preventing the raid from skipping an undesirable form. Either form being in use will cause Majordomo Staghelm to gain energy up to 100, which, once reached, will use a unique ability (varies depending on form). With each special ability, a stack of “Adrenaline” will increase energy regeneration by 20% per stack.

Role-Specific Tips

  • DPS - make killing the “Spirit of the Flames” as fast as possible a priority in this section of the Firelands raid in WoW to keep the Cat form in action for as long as you can. The flames from “Leaping Flames” can kill in seconds, so be ready with movement abilities at the ready for a quick exit. When in heroic difficulty, maintain maximum “Concentration” stacks wherever possible to ensure you meet the DPS requirements.
  • Healer - be prepared to carry out a mana-intensive and quick-healer-reaction-based battle, being mindful of players with high stacks of “Burning Orb” debuffs; this mechanic deals damage for 8 seconds after soaking new stacks has been stopped.
  • Similarly to DPS, in heroic difficulty, you must maintain maximum “Concentration” stacks to meet healing requirements.
  • Tank - save defensive cooldowns so that when healers are struggling, you can keep the raid alive. You’ll also want to consider minor defensive cooldowns and damage-reducing debuffs to take on multiple Spirit of the Flames to keep Cat form in play.

Majordomo Staghelm Abilities

  • Concentration
  • Fury
  • Adrenaline
  • Cat Form

Leaping Flames

  • Spirit of the Flame
  • Scorpion Form
  • Flame Scythe

Night Elf Form

  • Fiery Cyclone
  • Searing Seeds
  • Burning Orbs

firelands raid wow, ragnaros

Ragnaros - Battle Strategies

It’s time to check out the final boss in this Firelands raid in WoW guide. So, gear up as we prepare to go head to head with the Fire Lord once more. The battle ahead is not an easy one, and each and every member of your team must be ready to lock in, listen up, and fight to the death. Ragnaros will be in the center of a lava pool, which can cause you some hefty damage if you stand in it. The battle consists of three phases, each having a short intermission between them, and in heroic difficulty, you’ll find a fourth phase. Since the battle is quite intensive, we’d recommend taking a few trial runs or learning the phases intently before proceeding; if you do take on the challenge blindly, do quick pulls back-to-back in phase one and intermission one to find your feet. To get this part of the Firelands raid WoW journey started, you’ll want to spread your team out into 4 group positions, with your ranged and healers at least 6 yards apart.

Role-Specific Tips

  • DPS - the final battle is almost entirely movement-based, so you’ll want to prioritize proper positioning and placement before anything else. Search for the fiery light beams to gauge where the “Son of Flames” will spawn, allowing you to react to those closest to the hammer as quickly as possible. Lastly, don’t be afraid to use your personal defensive cooldown in difficult times of the battle to give your healers a short break.
  • Healer - buckle up for an extremely long mana, intensive, and heavy healing battle. Remain alert to top up low-health players before “Hand of Ragnaros,” “Wrath of Ragnaros,” or “Magma Trap Eruption” is dealt. You must also be extra attentive to potentiometers' “Dreadflame” fire patches and be ready to administer raid-wide defensive cooldowns.
  • Tank - tank swap for every 3-5 stacks of “Burning Wound,” save defensive cooldowns for times when your healer is moving from multiple mechanics at once, and keep the “Lava Scions” near “Son of Flames” to allow them to be AoE’d down together. Lastly, be cautious of the “Entrapping Roots” position in the fourth phase; you’ll need to keep Ragnaros near them, but do not activate them.

Ragnaros Abilities

Phase One

  • Sulfuras Smash
  • Lava Wave
  • Wrath of Ragnaros
  • Hand of Ragnaros

Magma Trap

  • Magma Trap Eruption
  • Magma Blast
  • Burning Wound

Intermission One

  • Splitting Blow
  • Lave Bolt

Son of Flame

  • Burning Speed
  • Supernova

Phase Two

  • Sulfaras Smash
  • Lava Wave
  • Magma Blast
  • Burning Wound
  • engulfing Flames
  • Molten Seed
  • Molten Inferno
  • Molten Elemental

Intermission Two

  • Splitting Bow
  • Lava Bolt

Son of Flame

  • Burning Speed
  • Supernova

Lava Scion

  • Blazing Heat

Phase Three

  • Sulfaras Smash
  • Lava Wave
  • Magma Blast
  • Burning Wound
  • Engulfing Flames

Living Meteor

  • Meteor Impact
  • Combustible

Phase Four (Heroic Only)

  • Magma Trap Vulnerability
  • World in Flames

Molten Elemental

  • Molten Power
  • Empower Sulfaras
  • Magma Geyser
  • Dreadflame
  • Superheated

Cenarius

  • Breadth of Frost

Malfurion Stormage

  • Cloudburst
  • Deluge

Arch Druid Hamuul Runetotem

  • Entrapping Roots

firelands raid wow, shatterskull bone crusher

Firelands Raid - WoW Loot

One of the most exciting things for players taking on the Firelands WoW raid is the rewards. Which is why we’ve broken down each of the boss's loot drops and shared drops; let’s get into it:

Shared Fireland Raid in WoW Drops

In both normal and heroic difficulty, you’ll have the chance to obtain the following:

  • Avool’s Incendiary Shanker
  • Entrail Disgorger
  • Eye of Purification
  • Shatterskull Bonecrusher
  • Firethorn Mindslicer
  • Skullstealer Greataxe
  • Zoid’s Firelit Greatsword
  • Smoldering Censer of Purity
  • Living Ember

Shannox Loot Drops

There are differing rewards for the normal and heroic difficulty of this Firelands raid in WoW; we’ll list them below for you to check out:

  • Coalwalker Sandals (normal/heroic)
  • Flickering Shoulderpads (normal/heroic)
  • Gloves of Dissolving Smoke (normal/heroic)
  • Scalp of the Bandit Prince (normal/heroic)
  • Treads of Impact Obedience (normal//heroic)
  • Bracers of the Dread Hunter (normal/heroic)
  • Legplates of Absolute Control (normal/heroic)
  • Legplates of Frenzied Devotion (normal/heroic)
  • Uncrushable Belt of Fury (normal/heroic)
  • Necklace of Fetishes (normal/heroic)
  • Crystal Prison Band (normal/heroic)
  • Feeding Frenzy (normal/heroic)
  • Leggings of the Fiery Conqueror (heroic)
  • Leggings of the Fiery Protector (heroic)
  • Leggings of the Fiery Vanquisher (heroic)
  • Crystallized Firestone (heroic)

Lord Rhyolith Loot Drops

All drops from this Firelands raid WoW encounter are both from normal and heroic difficulty experiences, excluding the final reward.

  • Flickering Cowl
  • Hood of the Rampant Disdain
  • Incentive Chestguard
  • Flaming Core Chestguard
  • Lava Line Wristbands
  • Cracked Obsidian Stompers
  • Earthcrack Bracers
  • Fireskin Gauntlets
  • Grips of the Raging Giant
  • Dreadfire Drape
  • Hearthstone of Rhyolith
  • Volcanospike
  • Arbalest of Erupting Fury
  • Crystalized Firestone

firelands raid wow, ward of the red widow

Beth’tilac Loot Drops

Similarly to the above Firelands WoW raid encounter, all items are received from both normal and heroic difficulty, excluding the final item.

  • Robes of Smoldering Devastation
  • Cindersilk Gloves
  • Cinderweb Leggings
  • Cowl of the Clicking Menace
  • Flickering Shoulders
  • Thoracic Flame Kilt
  • Arachnaflame Treads
  • Carapace of Imbibed Flame
  • Spaulders of Manifold Eyes
  • Widow’s Kiss
  • Spidersilk Spindle
  • Mandible of Beth’tilac
  • Funeral Pyre
  • Ward of the Red Widow
  • Crystalized Firestone

Alysrazor Loot Drops

Unlike its predecessors, this Firelands raid in WoW encounter, there are some differences between the normal and heroic loot drops; take a look:

  • Leggings of Billowing Fire
  • Flickering Wristbands
  • Phoenix-Down Treads
  • Clawshaper Gauntlets
  • Craterflame Spaulders
  • Moltenfeather Leggings
  • Clutch of Firemother
  • Greathelm of the Voracious Maw
  • Lavaworm Legplates
  • Spaulders of Recurring Flame
  • Wings of Flame
  • Alysrazor’s Band
  • Eye of Blazing Power
  • Alysra’s Razor
  • Chest of the Fiery Conqueror (heroic only)
  • Chest of the Fiery Protector (heroic only)
  • Chest of the Fiery Vanquisher (heroic only)
  • Crystalized Firestone (heroic only)

Baleroc Loot Drops

This is another Fireland WoW raid encounter that has some heroic difficulty specific drops; check it out:

  • Mantle of Closed Doors
  • Breastplate of the Incendiary Soul
  • Glowing Wing Bracers
  • Shoulderpads of the Forgotten Gate
  • Decimation Treads
  • Gatekeeper’s Embrace
  • Casque of Flame
  • Flickering Handguards
  • Helm of Blazing Glory
  • Necromantic Focus
  • Gatecrasher
  • Molten Scream
  • Shard of Torment
  • Gauntlets of the Fiery Conqueror (heroic only)
  • Gauntlets of the Fiery Protector (heroic only)
  • Gauntlets of the Fiery Vanquisher (heroic only)
  • Crystalized Firestone (heroic only)

firelands raid wow, shoulder of the fiery vanquisher

Majordomo Staghelm Loot Drops

Unlike others in this segment of our WoW Firelands raid guide, there are some difficulty specific items with these encounter drops; take a look at how they’re categorized below:

  • Wristwraps of Arrogant Doom (both)
  • Firecat Leggings (both)
  • Sandals of Leaping Coals (both)
  • Grips of Unerring Precision (both)
  • Bracers of the Fiery Path (both)
  • Breastplate of Shifting Visions (both)
  • Treads of the Penitent Man (both)
  • Flowforn Choker (both)
  • Jaws of Defeat (both)
  • The Hungerer (both)
  • Fandral’s Flamescythe (both)
  • Stinger of the Flaming Scorpion (both)
  • Mantle of the Fiery Conqueror (normal)
  • Mantle of the Fiery Protector (normal)
  • Mantle of the Fiery Vanquisher (normal)
  • Shoulder of the Fiery Conqueror (heroic)
  • Shoulder of the Fiery Protector (heroic)
  • Shoulder of the Fiery Vanquisher (heroic)
  • Crystalized Firestone (heroic)

Ragnaros Loot Drops

For the long-awaited final boss drops of the Firelands raid in WoW, you can expect a chance to receive the following items, some of which again vary on difficulty:

  • Fingers of Incineration (both)
  • Majordomo’s Chain of Office (both)
  • Crown of Flame (both)
  • Pauldrons of Roaring Flame (both)
  • Choker of the Vanquished Lord (both)
  • Matrix Restabilizer (both)
  • Variable Pulse Lightning Capacitor (both)
  • Vessel of Acceleration (both)
  • Ko’gun, Hammer of the Firelord (both)
  • Sulfuras, the Extinguished Hand (both)
  • Sho’ravon, Greatstaff of Annihilation (both)
  • Helm of the Fiery Conqueror (normal)
  • Helm of the Fiery Protector (normal)
  • Helm of the Fiery Vanquisher (normal)
  • Smouldering Egg of Millagazor (both)
  • Crown of the Fiery Conqueror (heroic)
  • Crown of the Fiery Protector (heroic)
  • Crown of the Fiery Vanquisher (heroic)
  • Crystalized Firestone (heroic)

Now that we’ve covered all of the potential loot drops in the Firelands Wow raid let’s take a look at the possible achievements you can complete when taking on these seven challenging encounters:

Firelands Raid in WoW - Achievements

By putting your skills to the test with this exciting team challenge, you can achieve the following:

  • Death from Above - kill Cinderweb Drones only when they are on top of the canopy while battling Beth’tilac in the Firelands raid in WoW.
  • Not an Ambi-Turner - defeat Lord Rhyolith without having him turn left at all while his armor is intact.
  • Do a Barrel Roll! - defeat Alysrazor without any raid members being hit by these moves: Bushfire, Incendiary Cloud, Lava Spew and Fiery Tornado.
  • Bucket List - take Shannox to Beth’tilac’s Lair, Path of Corruption, Shatterstone, Flamebreach, and The Ridge of Ancient Flame in one bout before dispatching him.
  • Share the Pain - slay Baleroc without any of your team suffering from Torment more than three times.
  • Only the Penitent - activate both the Fandral’s Flames at the same time without a raid member being hit by Kneel to the Flame.
  • Ragnar-O’s - take down Ragnaros while there are three Living Meteors ignited by Lava Wave.
  • Firelands - take down all bosses in the Firelands.
  • Firelands Guild Run - slay all bosses in the Firelands in a guild group.
  • Heroic: Shannox - defeat Shannox on heroic difficulty.
  • Heroic: Lord Rhyolith - defeat Lord Rhyolith on heroic difficulty.
  • Heroic: Beth’tilac - slay Beth’tilac on heroic difficulty.
  • Heroic: Alysrazor - take down Alysrazor on heroic difficulty.
  • Heroic: Baleroc - defeat Baleroc on heroic difficulty.
  • Heroic: Majordomo Fandral Staghelm - defeat Majordomo on heroic difficulty.
  • Heroic: Ragnaros - defeat Ragnaros on heroic difficulty.
  • Realm Curt! Ragnaros - be the first guild in the realm to defeat Ragnaros in heroic difficulty in a guild group.
  • Heroic: Ragnaros Guild Run - defeat Ragnaros in a guild group on heroic difficulty.
  • Glory of the Firelands Raider - battle all bosses in heroic difficulty and complete all other achievements.

firelands raid wow, sulfuron keep

Firelands Raid WoW - FAQ

As with all of our guides, it’s time to take a look at some of those frequently asked questions that play on our reader's minds and put any of your doubts to rest:

Is the WoW Firelands Raid Difficult?

This isn’t one of the hardest raids out there, but that’s not to say it’s a walk in the park, either. In normal difficulty, players must have at least level 35 to participate, but we, of course, always recommend higher levels to give that added edge. Additionally, you must factor in your group size, as even in heroic difficulty, a group of 25 players is going to have an easier time than 10. Given the complexity of some areas of these raids, we advise you to scope out the area, mechanics and phases of these raids to give yourself the best chance of success.

Which expansion is the Firelands Raid in WoW part of?

This raid experience is part of the third phase in WoW Cataclysm Classic, so if you want to enjoy the adrenaline-inducing adventure, make sure you have access to all of the necessary content.

The End of the Seven Sieges in the Firelands Raid WoW

After you have traversed the Firelands, taking down challenge after challenge, you’re owed a well-deserved rest and some time to wrap your head around the new loot drops, achievements and more. Once you’re ready to get back into action, take a deep dive into our blog section and find your next enthralling adventure! Additionally, you can find some outstanding WoWC items, an abundance of currency, and expertly built accounts to ensure your adventures are nothing less than exceptional. Take some time to browse today and line up your next Chicks Gold purchase! We’ll be back next week with some more interesting and challenging adventures; we hope to see you there!

logo
RS3 Gate of Elidinis - Overcome with Corruption RS3 Gate of Elidinis - Overcome with Corruption Training Manuals

Welcome back to the Chicks Gold blog series! In this article, we’ll be taking a deep dive into the brand new boss encounter, the Gate of Elidinis in RS3. We’ll walk you through the mechanics, methods, requirements, and more to ensure you can come out on top every time. So, buckle up and get ready for the adventure of a lifetime! This new skilling boss can be found in the Underworld after you complete the new Ode of the Devourer quest. It was a device that once connected the Underworld and Overworld to allow souls to return and be reincarnated. Sadly, it has since been corrupted by Amascut, meaning it now poses a threat to citizens of both worlds. 

You can take on the challenge of RS3 Gate of Elidinis solo or in a team of up to ten players. It’s worth noting, though, that the mechanics will be scaled accordingly, so there is no ‘easy’ way to take down the goddess. You’ll see the use of several skills during this encounter, including Agility, Construction, Crafting, Divination, and Mining, with the added chance of obtaining the Croesus skilling pet. So, now that we know a little bit more about this enthralling new encounter let’s take a look at what’s expected of you when you enter the arena. 

rs3 gate of elidinis

Requirements in Gate of Elidinis RS3

As with almost all RS3 encounters, you’ll need to have some things with you in order to get things going. So, let’s take a look at what’s required for this exciting new corrupted goddess encounter. 

Skill Requirements 

Interestingly, combat is not essential for this encounter, but there are still some skilling requirements you must meet to get started. Check them out: 

  • Agility - level 25
  • Archeology - level 86 
  • Cooking - level 20 
  • Magic - level 66
  • Necromancy - level 75 
  • Prayer - level 40 
  • Construction - level 54 
  • Slayer - level 10 

Quest Requirements 

For the quest requirements in this encounter, there is fortunately only one you’ll need to have tackled in order to enter into this encounter: Ode of the Devourer. 

Item Requirements

There’s not much you’ll need in the way of items, but take a look below for the full details: 

  • Pickaxe (to mind shards of Elidinis) - recommended to use the augmented Pickaxe of Life and Death with Tagga’s corehammer.
  • Elite Skilling Outfits - recommended to use any Golem Outfit as it offers increased Mining critical hit chance. 

Reaching RS3 Gate of Elidinis

Once you have met all of the requirements for this boss encounter, you’ll next need to know how to get there. It is found at the top of the Sanctum of Rebirth, so you’ll have three options for reaching the area: 

  • Use the gondola located by where you found the Suspicious Stranger in the Soul Searching quest. This is in the City of Um, on the northern dock. 
  • You can use a boss portal in the War’s Retreat hub. What makes this method so good is that this is a new boss, meaning the use of the fateful portal will not require a portal re-tune or a kill count. 
  • Lastly, if you’re proficient in all skills (99 in all), you can use the boss portal in the Master Guild. 

If you choose to teleport to the RS3 Gate of Elidinis encounter using the Beasts interface, you will see a Home Teleport is cast to the City of Um lodestone. 

gate of elidinis rs3

RS3 Gate of Elidinis - Mechanics and Strategy

The next step in the Gate of Elidinis RS3 walkthrough is understanding how to go about the actual encounter. You must first interact with Icthlarin to get things started, and your main goal is to cleanse the gate of all corruption. Keep in mind, though, that it won’t go down without a fight. At the beginning of the encounter, you will see that the gate has a corruption value of 90,000, and this caps at 125,000 for each player that’s present. If you reach the cap, RS3 Gate of Elidinis will end the encounter by killing all players in an instant.

The gate will restore its corruption by 25 for each game tick. So you’ll need to repeat Mining shards as necessary until you successfully eradicate the corruption. Unlike the Croesus encounter, the gate will be constantly trying to damage you and any teammates by scaling damage to maximum lifepoints, so we‘d recommend avoiding tank armor and bonfire boost. The damage it will inflict is hard, typeless damage, so the only way to avoid it at a consistent rate is to use Barricade. 

With all of this in mind, let’s discuss the attacks used by the Gate of Elidinis in RS3 that will no doubt keep you on your toes. 

RS3 Gate of Elidinis Attacks

  • Begone - The gate launches a blast of energy toward you and your team, inflicting around 60% damage to your overall lifepoints (hard typeless damage) if the moonstone barrier is not repaired. Repairing the barrier will lessen the damage by an average of 18%, meaning the damage is still hefty, so keep your eyes peeled. 
  • Rot and Suffer - The gate will throw a burst of corrupted energy at the scattered shards in the arena, charging them to detonate in a 9x9 AoE. If you are caught in the blast, you’ll lose 25% of your max lifepoints, and ten stacks of corruption will be added to them. This energy will primarily focus on uncleansed and unmined debris, and dodging this attack will reset Dive, as well as other movement abilities. In addition to all of this, if the attack lands, you will heal the gate by around 3,000 corruption. 
  • Children to me! - This will see the gate calling on two feline akhs, which will increase its corruption while they are alive. This will add around 833 corruption and take 333 damage each tick. Throwing moonstone shards at the akhs while dealing 7,500 damage, with two shards being required to kill them at full health. 

RS3 Gate of Elidinis Attack Rotation 

Now that we know the attacks that will be used, the next step in our Gate of Elidinis guide for RS3 is to see in which order they will be used against you. So, let’s explore: 

Start Point

  • 9 auto-attacks 
  • Begone 
  • 6-auto attacks 
  • Rot and Suffer 

Main Encounter Sequence

  • 6 auto-attacks with ‘Children to me!’ summoning 1-2 feline akhs on auto attack 4. 
  • Begone 
  • 6 auto-attacks 
  • Rot and Suffer 
  • Six auto-attacks 
  • Begone 
  • 6 auto-attacks 
  • Rot and Suffer 

The process will repeat as such until you and your team are able to neutralize the gate. 

gate of elidinis rs3

RS3 Rewards Gate of Elidinis 

After you complete the encounter (successfully, of course), you will see a loot chest that drops by the statue of Elidinis. There are unique, main, and tertiary drops to be obtained from this one, so we’ve broken them down into their rarity and prices, if applicable. If you do not take all items from the chest, they will be moved to the RS3 Gate of Elidinis Treasure chest outside of the instance. At this point, the collection log will be updated before any items are looted from the chest. 

Note: The Gate of Elidinis in RS3 does not drop charms. 

Let’s start by checking out the unique drops: 

Unique Drops 

  • Eclipsed Soul Prayer Codex (1) - Cost: 21,697,953
  • Memory Dowser (1) - Cost: 110,000,000
  • Runic Attuner (1) - Cost: 110,000,000
  • Scripture of Elidinis (1) - Cost: 285,536,690 
  • All unique drops from the RS3 Gate of Elidinis encounter are categorized as ‘rare.’ 

Main Drops

  • Battlestaff (20) - Cost: 93,100
  • Blue dragonhide (45) - Cost: 40,455
  • Cannonball (70) - Cost: 103,390 
  • Chaos rune (150) - Cost: 29,850 
  • Crystal key (15) - Cost: 232,275
  • Fire battlestaff (10) - Cost: 66,290
  • Huge blunt rune salvage (9) - Cost: 340,218
  • Luminous energy (661-745) - Cost: 281,586 - 317,370 
  • Medium plated rune salvage (6) - Cost: 128,784
  • Moonstone dust (10-15) - Cost: 235,460 - 353,190 
  • Mort myre fungus (50) - Cost: 165,650 
  • Nature rune (200) - Cost: 132,800
  • Prayer renewal 2 (2-3) - Cost: 22,038 - 33,057
  • Small plated orikalkum salvage (3) - Cost: 141,651
  • Soul rune (150) - Cost: 145,050
  • Super energy 2 (2) - Cost: 12,646
  • Uncut diamond (20) - Cost: 19,740 
  • Water battlestaff (10) - Cost: 65,980 
  • Wergali seed (5) - Cost: 9,065

All of the above potential drops are classed as ‘common’ rarity.

  • Catalytic anima stone (35-45) uncommon - Cost: 53,585 - 68,895
  • Uncut moonstone (1) rare - Cost: 410,362
  • Uncut onyx (1) rare - Cost: 1,062,621 
  • Coins (120,442-155,968) uncommon - Cost: 120,442-155,968
  • Manuscript of Elidinis (2-3) uncommon - Cost: 475,302 - 712,953
  • Onyx dust (25-34) rare - Cost: 209,950 - 285,532 
  • Papaya fruit (15) uncommon - Cost: 160,305 
  • Latent Offering (1) rare - Cost: 1,516,500

As you can see, there is plenty to be gained from taking down this new boss, and the earnings that can be made are quite something if you have the team and the time to put into the endeavor. With that said, let’s take a look at the last group of drops from RS3 Gate of Elidinis, the Tertiary drops. 

Tertiary Drops 

  • After the Floor (1) 1/10 - Cost: N/A 
  • Crystal triskelion fragment 1 (1) rare - Cost: N/A 
  • Crystal triskelion fragment 2 (1) rare - Cost: N/A 
  • Crystal triskelion fragment 3 (1) rare - Cost: N/A 
  • Fragmenty of the Gate (1) unknown rarity - Cost: N/A 
  • Sealed clue scroll (elite) (1) rare - Cost: 1 High-Level Alchemy 
  • Sealed clue scroll (master) (1) very rare - Cost: 1 High-Level Alchemy 
  • Starved ancient effigy (1) rare - Cost: N/A 

rs3 gate of elidinis

RS3 Gate of Elidinis FAQ 

As with all of our guides, and especially with topics so fresh as this Gate of Elidinis RS3 walkthrough, we provide our clients with answers to some of the most frequently asked questions on the topic. So, let’s take a look at what everyone is wondering and have those burning questions answered: 

Does this boss encounter offer any achievements?

Yes! You’ll be glad to know there are quite a few achievements to be gained from the completion (or multiple completions) of the RS3 Gate of Elidinis. Take a look at what’s up for grabs and how they’re earned: 

  • After the Flood - Find and read Elidinis’ memoir
  • A Chip Off The Old Block - Obtained via a collection of unique drops from the encounter. 
  • The Gate of Elidinis - Cleanse the gate

For multiple completions of this encounter, you will receive the ‘Pull Yourself Together achievements. We have listed them and the amount of successful encounters needed below: 

  • Pull Yourself Together I - Cleanse the gate 5 times 
  • Pull Yourself Together II - Cleanse the gate 10 times 
  • Pull Yourself Together III - Cleanse the gate 25 times 
  • Pull Yourself Together IV - Cleanse the gate 50 times 
  • Pull Yourself Together V - Cleanse the gate 75 times 
  • Pull Yourself Together VI - Cleanse the gate 100 times 

What is the Gate of Elidinis Hunt? 

This is a time-limited event that came with the encounter on release. It is only available until October 6, 2024, so ensure you try it out while you can! You can begin the encounter by speaking with the Priestess of Elidinis outside the Sanctum of Rebirth.

rs3 gate of elidinis

Peace Within the Land

After a hard day’s work cleansing the gate and restoring peace to the land, it’s time for you to kick back, relax, and enjoy your rewards! Once you’re refreshed and raring to go again, take a look at our blog section for some of the finest RS3 and OSRS content and walkthroughs out there. You’re sure to find a new adventure to tackle in no time. If, instead, you’re feeling like you’re unable to continue with such tasks due to not meeting requirements or having a low in-game balance, then we can help with that, too. Check out our RS3 gold page, questing services, affordable items, and much more to take your next RS3 adventure to all-new heights. We’ll be back next week to keep you up-to-date with the latest and greatest that RS has to offer.

logo
WoW The War Within: Nerub-ar Palace Raid Guide WoW The War Within: Nerub-ar Palace Raid Guide Training Manuals

Welcome back to another Chicks Gold WoW Guide. The latest expansion, The War Within, has got off to a great start, introducing many new features to WoW, including Delves, crafted PvP gear, and much more. Of course, with any new expansion and season, one of the most hotly anticipated releases are the raids. Today, we’ll be covering the first raid of WoW: TWW season one, the Nerub-ar Palace Raid.

Nerub-ar Palace is an exciting new raid with eight bosses to discover, learn, and conquer. In this guide, we’ll be examining Nerub-ar Palace and going over all the details, including locations, bosses, and loot. We’ll also discuss the known release schedule and what else you can expect from TWW raids.

Nerub-ar Palace Raid Lore

This raid takes place in the arachnid-themed land of Azj-Kahet, a new area in The War Within. Here, you will find Queen Ansurek, who rules from her throne in the Nerub-ar Palace, located southwest of the City of Threads. Her Sureki disciples are loyal to her, and she reigns over them from her place of power. However, there is growing rivalry from the Severed Threads, who plan to end her rule over this land.

nerub-ar palace

Important Raid Information

Let’s examine this raid and what players can expect from it.

Nerub-ar Palace release dates

Different raid types and difficulties will become available over time, with an additional story mode that can be played solo by players just wishing to progress through TWW’s story. Raid Finder Wing 1, Normal and Heroic difficulties, were released on September 10th, 2024, shortly after the release of TWW. On September 17th, Raid Finder Wing 2, Story and Mythic difficulty will be released, and then on September 24th, we will see the release of Raid Finder Wing 3.

Story mode

Players have the option to complete the raid as part of the story without the need to join other players. To facilitate this, you can have a maximum of 10 NPC party members. This means you won’t have to wait to start a raid and can begin or finish a raid at a time that suits you. However, completing Nerub-ar Palace Raid in story mode prevents any of the eight bosses from dropping loot. You’ll be able to start this raid in story mode after completing the first chapter of The War Within expansion. Then, visit Webster, who is located in Dornogal near the Horde Embassy, to begin the Our Chance to Strike Our Chance to Strike quest, which begins a questline culminating in To Kill a Queen to Kill a Queen. To begin the story mode raid, just speak to Kriz, the "Loyal" who resides in the City of Threads.

Quest rewards

Story mode raiding won't bring you any rewards in the typical sense, but there are some rewards for completing the final quest in this quest line. Successful players will receive 1400 Gold, 2500 Rep Vizier Commendation, 265x Valorstones Valorstones,

Severed strands buff

A new quest will arrive after the start of Season 1 of The War Within called The Finer Things. Players can collect Nerub-ar Finery, which is a new currency reward from raid bosses. This currency can then be exchanged for Severed Strands, which can be stacked and give you a maximum healing and damage raid buff of 18%. Please note that this buff is entirely optional.

Traveling to the Nerub-ar Palace

The exact location of the palace is /way 34.9 72.1, which is in the City of Threads in Azj-Kahet. The fastest way to travel there is by using the flight point located in the center of the City of Threads.

Nerub-ar Palace Raid Boss Overview

As mentioned, there are 8 Nerub-ar Palace Raid bosses, culminating in the main boss, Queen Ansurek. All bosses must be completed in linear order, except for two whose order you can decide when you reach that part. The boss encounters for this raid are as follows:

  • Ulgrax the Devourer
  • The Bloodbound Horror
  • Sikran
  • Rasha'nan
  • Broodtwister Ovi'nax/ Nexus-Princess Ky'veza - these bosses have optional orders.
  • Anub'arash and Skeinspinner Takazj
  • Queen Ansurek

The following are outlines of the eight bosses and some strategies for overcoming them. We will be covering Normal and Heroic difficulties.

Ulgrax the Devourer

Named after its insatiable hunger, Ulgrax the Devourer is one of Queen Ansurek’s fearsome and grotesque guards. This boss is the first you’ll encounter during the raid and has two phases you’ll need to learn that alternate once it reaches zero energy. The boss always starts on the same phase, which involves throwing spider webs out that root you to the ground for eight seconds if touched. Ulgrax also casts Carnivorous Contest during this phase, which pulls players in towards it. You can mitigate this effect by grouping together to take the hit as a team, which reduces the strength of the effect per player. Lastly, Ulgrax will cast Brutal Crush, which reduces the effectiveness of incoming healing. During the second phase, Ulgrax will take 99% less damage while summoning Ravenous Spawn, which must be killed. These spawn drop Chunky Viscera, which you should then take to the boss to feed it. You will also need to dodge the Juggernaut Charge attack during this phase. That’s all there is to this boss; just repeat these phases until it’s defeated.

Ulgrax the Devourer WoW TWW Raid

The Bloodbound Horror

The second boss of the Nerub-ar Palace WoW raid, the Bloodbound Horror, has one phase you will need to learn. Gruesome Disgorge targets the group tank and causes shadow damage. To minimize the damage, you should split your party into two equal groups and alternate tanking hits. The reason for this is because of The Unseeming, an alternative realm that you can be sent to and must defeat adds while preventing small adds from reaching the boss. Only those in The Unseeming can fight these adds, so it’s vital to split and maintain equal tasks in both realms. The Bloodbound Horror can also cast Grasp From Beyond, which causes two players to be debuffed each time, Goresplatter which creates a 60-yard AoE that you must escape from; and in the Heroic mode, Spewing Hemorrhage, which fires two arena-dividing laser beams.

Bloodbound Horror Nerub-ar boss

Sikran, Captain of the Sureki

Sureki is a powerful blade duelist and the captain of Queen Ansureks lair. Sikran has one phase, and Phase Blades is the first attack Sikran will make during it. This attack involves players being marked and then Sikran lunging at them with blades out. Marked players that are hit will create a Cosmic Simulacrum, which causes shadow damage to surrounding players. In Heroic mode, even unmarked players who are hit by the attack will create a Cosmic Simulacrum. After the Phase Blades, Sikran casts Decimate, which will cause damage to marked players and cause any Cosmic Simulacrums to explode, creating further AoE damage. After two Decimates have been cast, you should avoid the damage resistance debuff-causing Shattering Sweep attack.

Sikran WoW Raid Boss

Rasha'nan

Rasha’nan, another of Ansurek’s grotesque creations, makes its way from the earlier encounter in the Dawnbreaker Dungeon and begins this fight in a wounded state with only 60% health. Rolling Acid is the first attack Rasha’nan will cast that marks players and inflicts them with a corrosive poison. Marked players should avoid the attack waves as best as possible to minimize damage. Spinneret's Strands pull players towards Rasha’nan while causing nature damage every second. Infested Spawn spawns adds that you should defeat quickly, and in Heroic mode, players that are targeted will also cause AoE damage to surrounding players. Rasha’nan will frequently fly around the arena, casting Acidic Eruption, which you should interrupt while chasing him down to inflict more damage. In Heroic mode, Rasha’nan will also cast Web Reave, which causes meteors to fall on the targeted player. You can group together to share the damage from this meteor shower.

Rasha'nan

Broodtwister Ovi'nax

Depending on the order taken, Broodtwister Ovi'nax is the 5th or 6th boss you’ll encounter during the raid. Another single-phase boss, this boss fight takes place in an arena divided into three sections, with each section containing eggs that spawn adds. The fight starts with Ingest Black Blood, which involves the Broodtwister Ovi’nax ingesting black blood to become more powerful. Eventually, black blood will spill, and when it comes into contact with an egg, it will cause the egg to hatch, releasing the adds. Other dangers you’ll have to deal with are Experimental Dosage, a Colossal Spider that hatches from one of the big eggs, a Voracious Worm that hatches from medium eggs, and four Blood Parasites that hatch from egg clusters.

Broodtwister Ovi'nax Nerub-ar Palace Raid

Nexus-Princess Ky'veza

Nexus-Princess Ky'veza, a new arrival to the palace and confidante of Queen Ansurek, is a two-phase boss with intermissions that cause her to gain more power and become more difficult to defeat. This fight takes place in a hexagon-shaped arena. Essentially, the boss will fire an assassination attack at players, which will cause Nether Rifts to open at the location where the player is hit. These rifts pull players in, so the best strategy is to place them at opposite corners of the hexagon to cancel out the pulling effect. In Heroic mode, you should beware of Queensbane, which causes Dark Viscera to spawn if you’ve already been targeted. So if you’ve been hit by Queensbane, you should run as far away from your team as possible so they aren’t damaged by it. In phase two, Nether Phantoms will attack targetted players. In Heroic mode, the room will be divided into six equal segments, with two exploding every few seconds and moving clockwise throughout the arena.

Nexus-Princess Ky'veza

The Silken Court

The final boss arena before you take on Queen Ansurek is the Silken Court. Here, you will find the Queen’s closest advisors, Anub'arash and Skeinspinner Takazj. These bosses have three phases and two intermissions. In phase one, two players will need to become bound by webs from Web Bombs; then, you can stop the boss's charge by making him hit the Binding Webs. For Heroic mode, you will need two Binding Webs to stop it. During the intermission, Skeinspinner Takazj teleports to the center of the arena and creates a shield; you must destroy this shield to progress. In phase two, Skeinspinner Takazj then creates an AoE and causes all players hit to be joined by Binding Webs. To break the web, just run as far from your bound player as possible. Also, Stinging Swarm will release swarms of insects at players. Intermission two will see the other boss, Anub'arash, teleport to the center and shield itself; once again, you must destroy this shield to continue. In the third phase, all previous attacks will take place, with the exception of Web Bombs.

Silken Court Raid

Queen Ansurek

For the final battle of the raid, you will face Queen Ansurek herself. This fight has three phases and two intermissions. Phase one begins with Liquefy and Feast being cast on an active tank in your party. Next, a targetted player will be hit with Reactive Toxin; if that happens to you, you must move to the edge of the arena. Venom Nova will cause a ring to grow in size that heavily inflicts damage upon anyone in its path, and Silken Tomb will cause players to remain rooted in place. The first intermission sees the Queen creating a large shield and pulling players in toward her. After the shield is broken, phase two begins. During this phase, you won’t be able to damage the boss, and you will need to ascend on the outer platforms while killing Ascended Voidspeakers, who, upon death, will push you back and allow you to ascend further. You will have to defeat many adds during the phase, including Devoted Worshipper and Chamber Guardians. Finally, in phase three, you can damage the boss again. You should be wary of the Abyssal Conduit AoE effect, which will target players, and Summoned Acolytes, which you must kill immediately. Upon defeating Queen Ansurek, you’ll have the chance to receive some Nerub-ar Palace loot, including the mounts Reins of the Sureki Skyrazor, Reins of the Ascendant Skyrazor, weapons Ansurek's Final Judgment, Sovereign's Disdain, and the very rare Seal of the Poisoned Pact.

Queen Ansurek

FAQ

Here are some frequently asked questions about this raid.

What is the first The War Within raid?

The War Within first raid is the Nerub-ar Palace Raid. It takes place in the City of Threads, located in the kingdom of Azj-Kahet.

How many bosses are in Nerub-ar Palace?

There is a total of eight bosses during this raid, including the main boss and ruler of the City of Threads, Queen Ansurek.

Are there any buffs for the Nerub-ar Palace raid?

Taking part in The Finer Things quest will allow you to obtain the new currency Nerub-ar Finery. This currency can then be exchanged for Severed strands, which buffs your damage and healing by up to 18%.

Nerub-ar Palace Raid Conclusion

Hopefully, you will be able to tackle this raid with ease and be in good standing for future seasons of The War Within. As a first raid, it isn’t too complicated, but it is a lot of fun, and there are variable difficulties to satisfy different skill levels. Furthermore, there is a lot of great loot to obtain, so this is worth giving a go. However, if you’d just like to continue through the story and aren’t interested so much in the raiding aspect of WoW, then you can complete this once in solo story mode with NPC party members - there really is something for everyone. If you enjoyed this blog and want to learn more about WoW Nerub'ar Palace and other content, raids, and more, then be sure to check out our WoW blogs. Additionally, if you’re looking for cheap WoW Retail gold, then head over to our WoWR gold page today and bask in our low prices!

logo
RS3 Ode of the Devourer - A Brand New Adventure RS3 Ode of the Devourer - A Brand New Adventure Training Manuals

Welcome back to the Chicks Gold blog series! In this installment of our walkthrough series, we will be discussing the new Ode of the Devourer RS3 adventure. This is a member quest, part of the Age of Chaos (sixth age), and part of the Fort Forinthry quest series. Within this new quest, you will be tasked with investigating and putting an end to the soul devourer curse that is looming over the Kharidian Desert. Additionally, this is not just a brand new adventure to embark on and grow your knowledge of RS3; it will also grant access to the upcoming Gate of Elidinis boss encounter, giving you even more fantastic RS3 content to work your way through. So, let's delay no further and get into the requirements for this adventure! 

rs3 ode of the devourer

RS3 Requirements - Ode of the Devourer

As mentioned, this is a members-only quest, so ensure your membership is up-to-date before you dive into this adventure. Additionally, it's a medium to long-length quest, meaning this endeavor will take you between 35 to 60 minutes on average to complete. Now, with that out of the way, let's discuss the actual requirements for RS3 Ode of the Devourer: 

Requirements 

You'll need to have completed the following quests to begin this adventure: 

  • Requiem for a Dragon 
  • Battle of Forinthry 
  • Ancient Awakening 
  • Dead and Buried 
  • Unwelcome Guests 
  • Tomes of the Warlock 
  • The Spirit of War 
  • Vessel of the Harbinger 
  • Rune Mythos 
  • Ghosts Ahoy
  • The Jack of Spades 
  • Diamond in the Rough 
  • Stolen Hearts 
  • Kili Row 
  • Necromancy! 
  • Soul Searching

There are no item and skill requirements for this quest, so you’ll only need to have completed the above quests. 

ode of the devourer rs3

Enemies Ahead

During this new, exciting adventure, you will face several level 115 foes while avoiding telegraphed attacks, as well as the Gate of Elidinis (level 650). So prepare accordingly.

RS3 Ode of the Devourer - Curiosity and Curses

Start this exciting new adventure by heading to Fort Forinthry to speak with Bill. Upon your arrival, you will see that a makeshift dummy created from cabbages is in his place, with a note attached stating that Bill is out gathering supplies. Curiosity will get the better of you however, once you realize it is clear that the dummy has been there for some time. So, your first Ode of the Devourer RS3 task will be to head to the command center. When you arrive, speak with Overseer Siv and ask Bill's whereabouts, where you'll discover that he traveled to Al Kharid. Of course, this piques your curiosity further, so get ready to travel to Al Kharid and prepare for a battle. 

Locating Bill in RS3 Ode of the Devourer

Teleport to the Al Kharid lodestone and click the floating quest icon found nearby. You'll then see that Feline and Salawa Akhs are attacking the city. So, you'll be tasked with helping the citizens defend their homes and push back against the Akh. While doing so, you must also rescue three individuals: 

  • Ayesha: go northwest to find her and defeat the Feline Akh there to rescue her.
  • Zeke: go to the east to find and save him. 
  • Ali Morrisane: she can be found and rescued to the south. 

Once you've saved these three citizens, head southwest into the city and crawl under a cart, then defeat the remaining Feline Akh before locating and speaking with Bill. When you do, you'll come to realize he is cursed by a soul devourer. This realization will bring about your next RS3 Ode of the Devourer task, which is to head to the Sanctum of Rebirth.

Journey to Sanctum of Rebirth

When you arrive at the Sanctum, interact with the quest icon before speaking with Icthlarin. He will inform you that the only way to break the curse placed on Bill is to cleanse Elidinis' Gate of all corruption. The devourers have tainted the gate that Amascut once used to judge souls, where either rebirth or destruction was the outcome. However, now she has the role of the Devourer, she wishes to use it to consume souls instead. Icthlatin will, at this stage, reveal that the soul devourers that are plaguing the desert and the curse inflicted on them all stem from Amascut's twisted manipulation of the gate's control of life and death.

Anyone influenced by this curse is doomed to become a devourer themselves, thus falling under the influence of Amascut, leaving you with no choice but to cleanse the gaye and break Bill's curse. To move forward with RS3 Ode of the Devourer, Ictrhlarin suggests you seek help from Zemouregal, who has a much deeper understanding of the ancient magics and the underworld. 

Back to Fort Forinthry in RS3 Ode of the Devourer

Make your way back to Fort Forinthry and go to the Command Center's prison to speak with Zemouregal. You must convince him to assist you with cleansing the gate, but during your conversation, you will discover that only someone with an Elidinis blessing can access the gate. You will also uncover the fact that Zemouregal is in possession of a more powerful item that can help purify the gate. 

Note: If you log out at any point during this stage, you will need to return to the Command Centre to collect Zemouregal.

rs3 ode of the devourer

Gate Cleansing Preparation 

For your next Ode of the Devourer RS3 task, you will need to collect some objects in order to prepare for the cleansing. So, let's take a look at what you'll need to do: 

Idol of Amascut

You'll need to locate the Idol of Amascut in order to properly carry out the cleansing. So, make your way from Shantay Pass and, go southwest past the Kalphite Hive, and interact with the spinning quest icon found near the monument. When you have done so, teleport back to Al Kharid and go to the gate in the northeast. You'll find another quest icon; click it. Once you have done so, go south to the city center and speak to Father Salman. After this conversation, go to the northeastern gate to talk with Ali Morrisane. You'll need to persuade him to give you the idol, but he will refuse to do so. After this refusal, go back to Zemouregal, and he suggests spreading a rumor that Ali brought a curse to the area. 

To ensure the rumor takes hold, you must go to five citizens and convince them of this before talking to Ali again, who will reluctantly provide you with the idol. With it now in your possession, return to Father Salman to conduct the next step in this RS3 Ode of the Devourer walkthrough. 

Shard of Elidinis' Gate

For this next stage in the quest, you'll need to head to the Mahjarrat Ritual Site and talk to Icthlarin. You can use the Fairy Ring code DKQ to go to Galcor Cave, exit the cave, and walk to the northwest. If you haven't completed Ritual of Mahjarrat, then Zemouregal will lead you to the square inside Fort Forinthry, where he can then teleport you to the ritual site. 

From there, you must search the corrupted Forgotten Warriors in the area until you uncover an absorption rune and the ceremonial dagger. When you have both, speak to Zemouregal again and use the absorption rune on the ritual marker twice until you see it only has 'faint' energy. When you see this, use the ceremonial dagger to extract the shard of Elidinis' Gate before returning to speak with Zemouregal again. 

Now you have the necessary items to lift the curse, return to the Sanctum of Rebirth and click the quest icon again to speak with Icthlarin. You'll next have to combine the idol of Amascut and the shard from the Gate with Icthlarin's blessing and you will get the blessing of Elidinis. So, get ready for combat and ensure you have food, as the next step in our Ode of the Devourer quest guide for RS3 is to go into battle!

rs3 ode of the devourer

Cleansing the Gate of Elidinis in RS3 Ode of the Devourer

Enter the gate and begin the final battle through Icthlarin, with your end objective being to drain the gate's health to zero. 

Note: we recommend having 6-8 empty inventory slots to get moonstone and cleansed statue shards throughout the battle. 

Battle Strategies

  • Avoid any blue-highlighted squares 
  • Kill Feline Akhs as soon as they spawn to prevent them from healing the gate (ensure moonstone shards are in your inventory) 
  • You can repair moonstone barriers to reduce damage, but this will extend the length of the battle.
  • We recommend using the special action button to attack the gate instead of doing so directly. 

Into War in RS3 Ode of the Devourer

To prepare before you enter into the battle itself, we recommend mining the moonstone nearby until you see red shards appearing on the ground; once you see this, you should have enough for the encounter. You should then transmute the red shard, mining until you collect as much as you can carry of Cleansed Statue shards (remember to avoid the blue squares). You will then need to move in closer to the boss, hit the special action button, and when the jump pillars appear, click on them quickly. You should then use the pillars to leap to the highest possible point and attack Elidinis. After doing so, surge to the green circle by Icthlarin to heal yourself and dodge the special attack; you will see a chat message when the attack is successfully protected against. 

It is at this stage that you will begin to repeat the steps mentioned above until you are able to cleanse the gate. Once you have done so, continue to the next stage of Ode of the Devourer RS3.

ode of the devourer

Into the Shadowsands

With the gate now cleansed, speak to Icthlarin, and Amascut will transport you into the Shadowsands, where you will go toe to toe with her avatar. Here, you must defeat four waves of Feline and Gorilla Akhas while again avoiding the blue squares. At points, Icthlarin will call you to stand inside a barrier; you must do so immediately to avoid instant death. Once you are able to escape with the help of Icthlarin, Zemouregal will then rejuvenate himself using the gate's power. He will then go on to discuss the battles on the horizon with Icthlarin. 

To close off this adventure, you'll need to speak with Zemouregal a final time and use the second chat option to send him back to his cell. You must then return to Fort Forinthry prison, where you will find Bill to be fully recovered and awaiting your return to provide you with gifts of thanks for the citizens of Al Kharid. And that marks the end of RS3 Ode of the Devourer; let's check out those rewards. 

Ode of the Devourer Rewards RS3

This new and exciting adventure brings with it quite the list of rewards, so let's check those out: 

  • One Quest point 
  • Amulet of Offerings 
  • Mining XP lamp (50,000 Mining XP, requires 60 Mining to use) 
  • Agility XP lamp (50,000 Agility XP, required 60 Agility to use) 
  • Divination XP lamp (50,000 Divination XP, requires 60 Divination to use) 
  • Crafting XP lamp (50,000 Crafting XP, requires 60 Crafting to use) 
  • Elidian Mysteries I
  • Elidian Mysteries II 
  • Access to Gate of Elidinis skilling boss 
  • 2 Treasure Hunter Keys (N/A for Ironman accounts) 

Music Unlocked 

  • Crimson Moonlight 
  • Icthlarin's Lament 
  • Ode of the Devourer 

rs3 ode of the devourer

RS3 Ode of the Devourer FAQ

As always, and especially with this new adventure, we have compiled some of the most frequently asked questions to ensure you go into this endeavor with eyes wide open and no confusion. Take a look: 

Is this quest required for the completion of any other in-game?

No, due to the fact this is a new quest, it is not yet a direct requirement. But as we all know, with the introduction of new content, this is subject to change. 

Are any achievements unlocked for doing this quest? 

Yes, you will receive the 'Ode of the Devourer' achievement when you reach the end of this adventure. 

What is the Gate of Elidinis boss encounter?

This new boss encounter will see players battling against the Gate of Elidinis, which was once a device connecting the underworld and overworld. However, Amascut has corrupted it and is now using it to pose threats to those who come close. 

ode of the devourer rs3

Cleansed, Calm, and Content 

After another action-packed adventure in-game, it's time to take some time to recharge and get ready for the next bout of questing. We have dozens of other RS3 blogs in our blog section, ready to walk you through every step of the adventure! So, when you're ready to take the next steps, don't forget to check them out. We also have the lowest rates on RS3 currency, items, and accounts, so you can replenish your bank, acquire rare attributes, or just get your hands on a whole new way to adventure. Whatever you need to make your traversing through Gielnor run smoother, we've got you covered.